Offline Overleaf
Overleaf has been widely adopted as the standard tool for collaborative scientific writing. Perhaps, its greatest selling point is that a \(\LaTeX\) document can be edited at the same time by all the authors. One of its non-widely known features is that it handles the document changes throughout a GIT repository. This means that you can work on your document offline with your own favorite tools. In this post I talk about combining Overleaf with Sublime as \(\LaTeX\) editor, GitKraken as GIT GUI client, and Meld as diff tool.
Why I don’t like Overleaf editor? Mainly because:
- Managing files is painful.
- It only commits atomic changes.
- Comparing all paragraph changes between versions is cumbersome.
- Comparing the whole project files is impossible.
- You can’t preview equations and images in the edit window.
- You can’t split the view into edit window and PDF viewer.
- It doesn’t have support for REGEX.
- You easily leave double spaces across the document.
- It doesn’t have a dark theme.
- It doesn’t have a horizontal/vertical split view.
- Its compiler and visualization might not feel fast enough.
Setup
Although I have previously used other \(\LaTeX\) editors like Texmaker and TeXShop, my personal choice is Sublime because of its versatility.
1. Install a \(\LaTeX\) distribution. You need a \(\LaTeX\) distribution to compile your documents in your OS. For Apple fans, the MacTeX distribution is really easy to install in the Mac OS environment. For an Ubuntu user, the installation is just one line:
sudo apt install texlive-latex-extra
2. Install Sublime Text. If you don’t already have it installed, you need to follow the steps from their website.
3. Install Package control. Package control manages Sublime’s plugins. Open Sublime and do the following:
-
Open the command palette
Press
Linux: ctrl+shift+porMac: cmd+shift+p -
Type
Install Package Control, and press enter
Other installation instructions can be found here.
4. Install the LatexTools plugin.
-
Open the command palette
Press
Linux: ctrl+shift+porMac: cmd+shift+p -
Type
Package Control: Install Package, and press enterAnother listing box will open after a few seconds.
-
Type
LaTeXTools, and press enter
5. Install and configure Skim (for Mac users only). Skim is a PDF viewer for Mac that is a good complement for Sublime.
-
Install it from here.
-
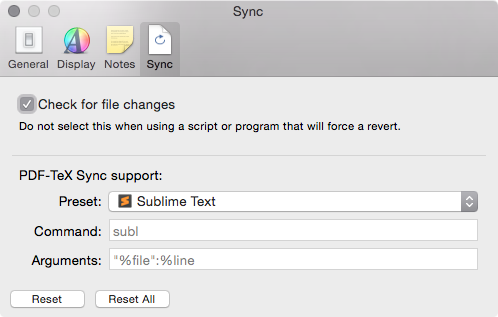
Go to Skim’s preferences by clicking Skim > Preferences or pressing
cmd+,. -
Click the Sync button.
-
Click on the Check for file changes box.
-
Select Sublime Text from the Preset menu
The options should look something like this:
6. Install GitKraken. GitKraken is a nice GIT GUI client that makes easy to visualize commits in window. You can download it from their official page.
7. Install and configure Meld. Meld is one of those great diff comparison utilities that you didn’t know you need.
1. In Ubuntu you can install it by simply typing in the command line:
sudo apt-get install meld
In MacOS X you can install it using Homebrew by typing:
brew install homebrew/gui/meld
If you are one of those lost souls that doesn’t like Homebrew you can install it using one of these DMG images and fixing some rough edges by following this Stackoverflow solution but I highly recommend the Homebrew solution.
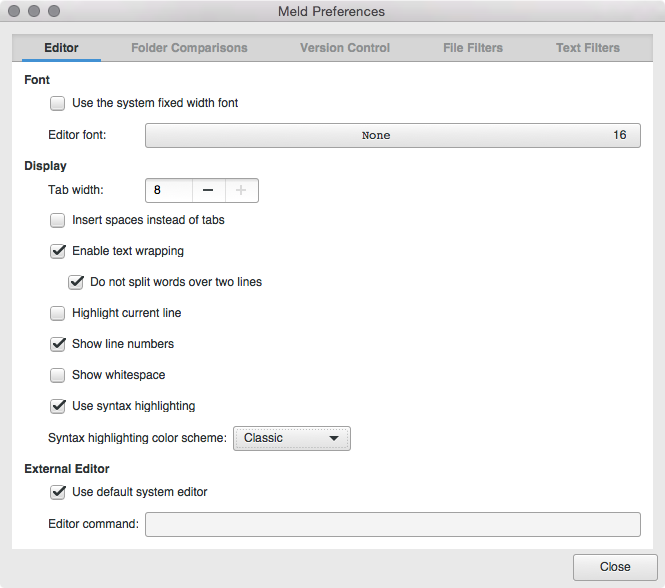
2. Go to Meld’s preferences by clicking the menu Meld > Preferences (or in Python > Preferences if you are running a Python widget).
3. Under the Editor tab, make sure the following options are checked: Enable text wrapping, Do not split words over two lines, Show line numbers, and Use syntax highlighting. Your configuration should look something like this:
GIT Cloning your \(\LaTeX\) project
1. Obtain the GIT url of your Overleaf project. You can get it by clicking the Overleaf menu > GIT button as the images below show:
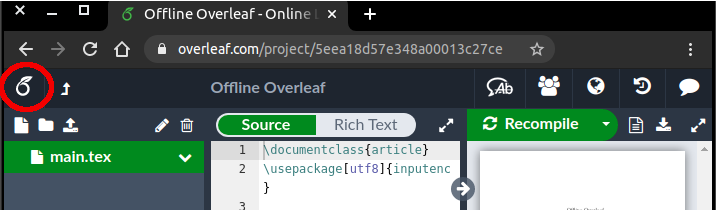
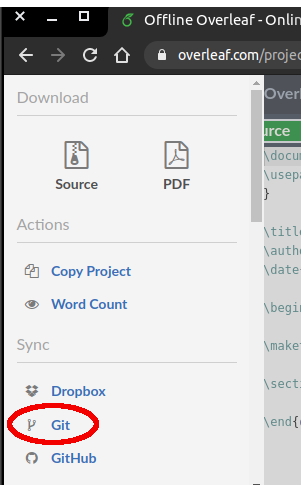
A popup dialog with the URL address will appear similar to the next one.

2. Clone the project. In this example, I would clone my project and rename it with a command like:
git clone https://git.overleaf.com/5eea18d57e348a00013c27ce latex_document
3. Create a .gitignore file. Since the \(\LaTeX\) compilation creates many auxiliary files, it is better to keep them out of our repository by ignoring them with a .gitignore file inside of the project.
The following .gitignore file contents is the largest I have used, but new auxiliary files can be created depending on the \(\LaTeX\) packages you might add to your document. You can straight copy the contents or download it from here.
*.acn
*.aux
*.bbl
*.blg
*.bib.bak
*.brf
*.fdb_latexmk
*.fls
.gitignore
*.glo
*.ist
*.lof
*.log
*.lot
*.maf
*.mtc*
*.out
*.pdf
*.synctex.gz
*.synctex.gz(busy)
*.tdo
*.toc
*.sublime-project
*.sublime-workspace
Note that I am also ignoring PDF files, so if one of your images is a PDF, you would have to force its addition to your repository.
Editing your \(\LaTeX\) project using Sublime
1. Open the \(\LaTeX\) project. You can straight forward open the directory containing your \(\LaTeX\) project and start working on it. From the command line, you can open it by typing:
subl latex_document
If you created the .gitignore file, then a Sublime window similar to the next one will show up.
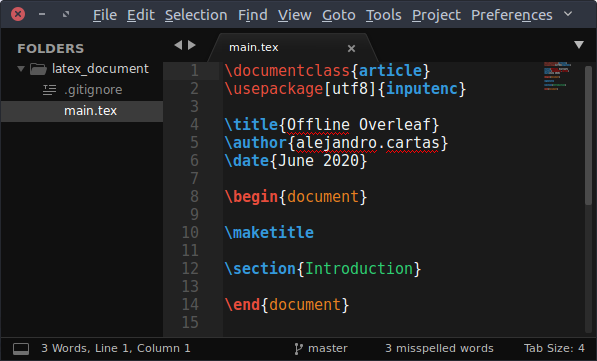
2. Compile your document. Under your main \(\TeX\) file, you can compile it by pressing Linux: ctrl+b or Mac: cmd+b.
This will create all the \(\LaTeX\) auxiliary files and a PDF file containing your document will show up.
3. Create a Sublime project (optional). You can create a Sublime project to not show the \(\LaTeX\) auxiliary files in the Navigation sidebar.
-
Click in the menu Project > Save project as… and type a name for the project. This will create two JSON files with extensions .sublime-project and .sublime-workspace.
-
Edit the recently created project file with extension .sublime-project and add the files to exclude like the following:
{
	"folders":
	[
		{
			"file_exclude_patterns":
			[
				"*.acn",
				"*.aux",
				"*.bak",
				"*.bbl",
				"*.blg",
				"*.bib.bak",
				"*.brf",
				"*-eps-converted-to.pdf",
				"*.fdb_latexmk",
				"*.fls",
				"*.lof",
				"*.log",
				"*.lot",
				"*.maf*",
				"*.mtc*",
				"*.out",
				"*.sty",
				"*.synctex.gz",
				"*.synctex.gz(busy)",
				"*.tdo",
				"*.toc"
			],
			"path": "."
		}
	]
}
Managing your \(\LaTeX\) git repository using GitKraken
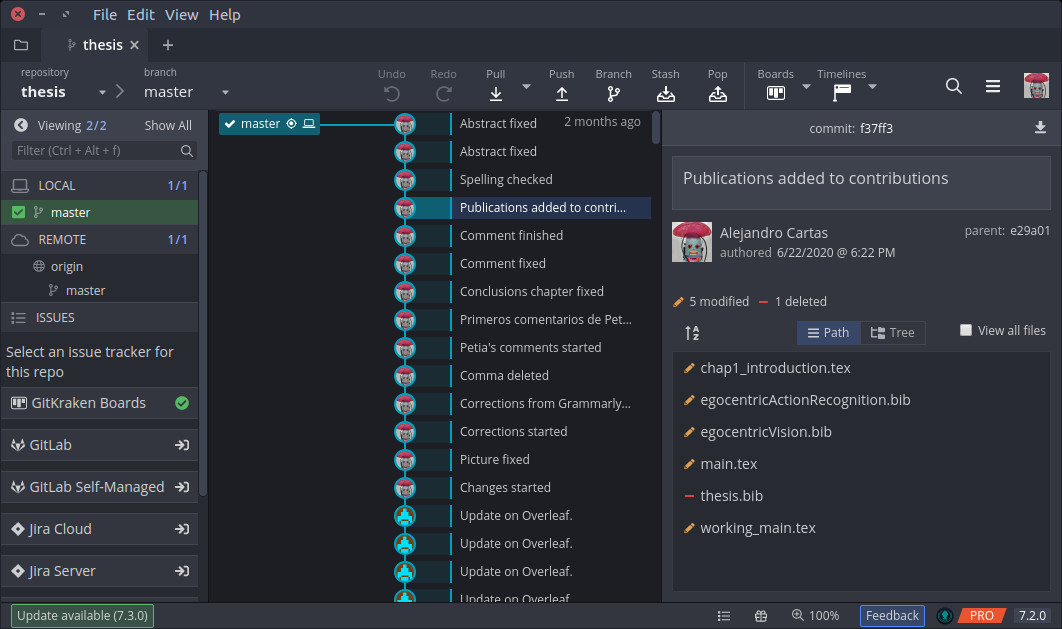
GitKraken is a Git GUI client that makes the Git management easy. In order to open a private repository, you need a professional account that you can freely get if you are a student here. You can open your repository by pressing Linux: ctrl+o or Mac: cmd+o and pointing to the directory location of your \(\LaTeX\) project.
The next image shows an Overleaf \(\LaTeX\) project with several commits opened in GitKraken. You can see the automatically atomic commits done in Overleaf by another contributor at the bottom of the list.
Using Meld to compare different commits
Meld is a great visual diff and merge tool. The syntax for using it inside the git project directory is in three possible ways:
a) Show the differences between 2 specific commits:
git difftool -t meld --dir-diff COMMIT_A COMMIT_B
b) See all modifications in the working directory with respect a specific commit
git difftool -t meld --dir-diff COMMIT_A
c) See the current changes in the working directory with respect to the last commit
git difftool -t meld --dir-diff
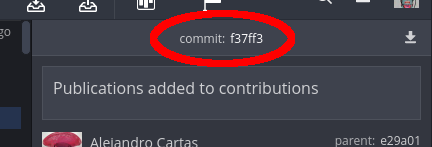
A visual way to get the commits ids for making a diff comparison is by clicking on the commit button in GitKraken. This button is located in the top right corner of the window, for instance, the commit id from last figure is seen here:
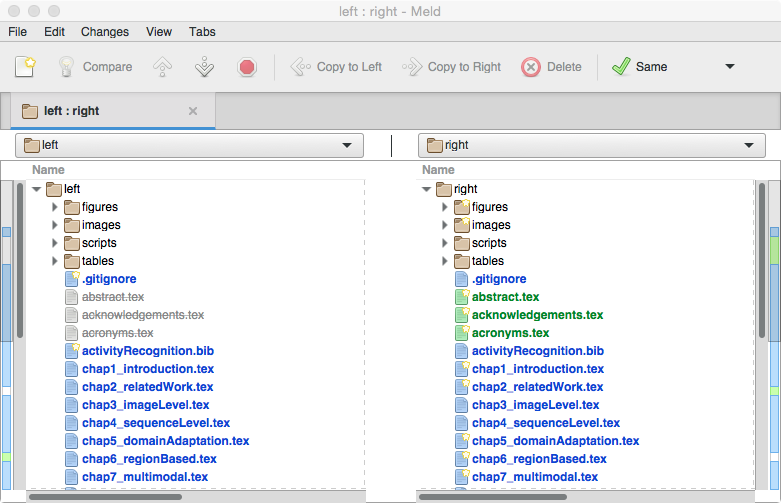
For example, typing the git difftool command and pasting commit id
git difftool -t meld --dir-diff f37ff3856a4abe1ff2e540b40dbb12399cb5c9bd
will open the following directory comparison view in Meld:
Then clicking on a modified \(TeX\) file will show the changes by paragraph and specific words. For instance, the next figure shows fixed grammar mistakes.
