Making Isometric Projections in Python
One of the common images I used to show in my figures were three-dimensional sequences of frames representing videos, for example the image shown below. Since I wasn’t as good as I wish to be with Inkscape or GIMP I decided to create a Python script for doing it. So this post covers the gist I made for the code. The python script assumes that OpenCV is installed in your system and its accompanying Bash wrapper only needs the xargs command.

Basically, what we need to do is an isometric projection of the frames from the video, this transformation looks like this:
![]()
This transformation is just a mapping between the plane of the original image and the desired projected plane. So the first step is to establish the landmark points from both planes. Since the image is a rectangle we just need the respective four corner points from the source and the target. These points can be easily calculated as seen in the next diagram.
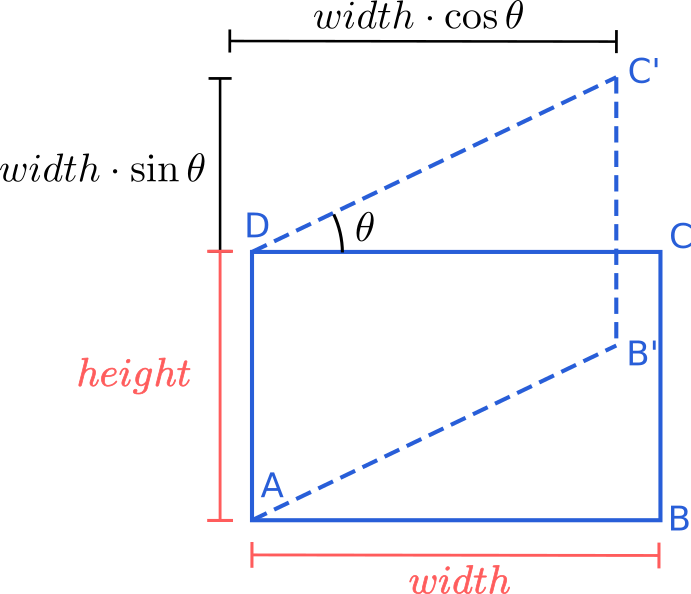
The four points from the source image \((A,B,C,D)\) look like this:
height, width = img.shape[:2]

pts_src = np.array([[1, 1],
                    [width, 1],
                    [width, height],
                    [1, height]], dtype=float) - 1
And four points from the target image \((A,B^{'},C^{'},D)\) can be computed with:
new_width = int(width * np.cos(angle * np.pi / 180.))
added_height = int(width * np.sin(angle * np.pi / 180.))
new_height = height + added_height

pts_dst = np.array([[1, 1],
                    [new_width, added_height],
                    [new_width, new_height],
                    [1, height]], dtype=float) - 1
The second step is create a mask for the projected image since it must have two triangular transparent areas, as seen in the image below.
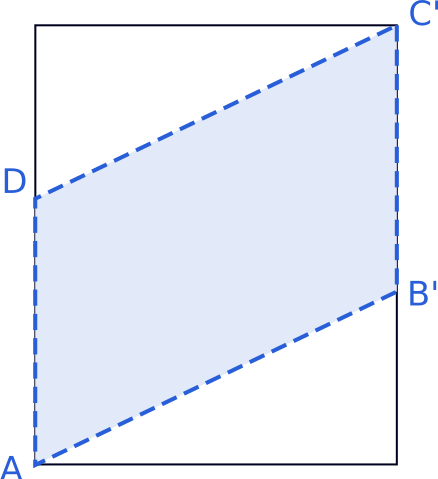
We only need to create a new image with an extra alpha channel. The mask is simply the polygon defined by the target points that we already calculated, so the code is something like this:
projected_img = np.zeros((new_height, new_width, 4), dtype=np.uint8)

mask = np.zeros((new_height, new_width), dtype=np.uint8)
cv2.fillConvexPoly(mask, pts_dst.astype(int), 255, 16)

projected_img[:, :, 3] = mask
The next step is to calculate the homography between the planes and warp the image to the target planes. This only requires two lines of code:
h = cv2.findHomography(pts_src, pts_dst)[0]
projected_img[:, :, :3] += cv2.warpPerspective(img, h, (new_width, new_height))
Another addition to the code is to consider a horizontal mirror to the image, since the angle can be just between \(0^{\circ}\) and \(90^{\circ}\). So this finally results in:
h = cv2.findHomography(pts_src, pts_dst)[0]
if not mirror:
    img = img[:, ::-1]

im_temp = cv2.warpPerspective(img, h, (new_width, new_height))
projected_img[:, :, :3] += im_temp

if not mirror:
    projected_img = projected_img[:, ::-1]
The final step is to save the image with the extra channel for the transparency. It seems that the only way to save an image with an alpha channel is to use the PIL library and doing the following:
out_img = Image.fromarray(projected_img, 'RGBA')
out_img.save(output_img)
The gist comes with a Bash wrapper for the Python script. This wrapper accepts several files as input, checks if they are images, and process them in parallel. Pretty neat, eh!!
Making the Example Image
In order to make the example image in this post, I first downloaded this small video from pixabay. Then I extracted all its frames with ffmpeg:
ffmpeg -i video.mp4 frame-%04d.jpg
Then I uniformly sample every 75th frame and project it
project_images.sh -m $(ls -1 frame-*.jpg | awk '{if (NR%75 == 0) {print} }')
As a final step, I scale them down with ImageMagick:
mogrify -resize 20% projected_15_frame-*.png